
The short answer
Compare where water is arriving before changing the schedule. One affected emitter suggests a different starting point from a whole weak zone. Inspect for leaks and restrictions, then check component specifications.
Applies toHome garden drip systems. Pressure, filter specification, maximum line length, and flow requirements must come from your actual components.
Run a brief observation cycle using the timer’s manual function. Compare emitters of the same rated flow, not a high-flow dripper against a low-flow one. Note the pattern, stop the supply before opening anything, and change one thing at a time.
01First, map the pattern
Walk the operating circuit and look for leaking joints, unusual wet patches, pinched feeder tubes, and dry outlets. A wet patch away from an emitter may point to a supply-line leak. Weak flow at the end can also be associated with pressure loss.
The sketch is a way to organise observations, not an installation plan. The arrangement of backflow protection, controls, filtration, and regulation depends on the kit and local requirements.
Read the pattern along the line
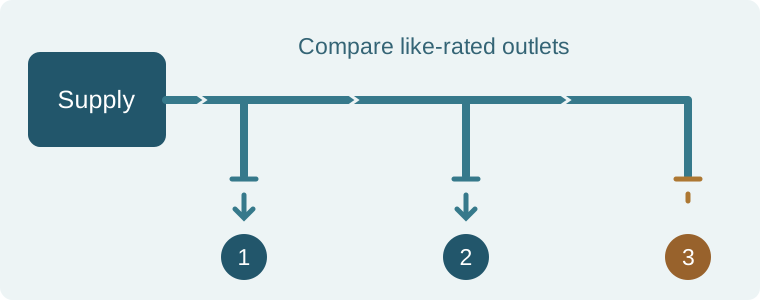
- 1Near the supply
- 2Middle of the line
- 3Far end of the line
The check
Compare the beginning, middle, and end of the same line. Write down which outlets work and which do not.
What did you find?
Only one outlet differs
Next stepStart locally at that outlet and its feeder.
Several outlets share the problem
Next stepLook for a cause in the supply they share before replacing every emitter.
Based on source 1.
02One emitter: check the small, local parts
Inspect the small feeder tube for a pinch or break, then inspect the affected outlet. Deposits and debris can obstruct emitters. Clean only as the component maker permits; replace a faulty removable emitter with the correct fitting and flow rating.
An emitter built into dripline is different from a removable point-source dripper. Hunter’s inline-drip maintenance guidance describes replacing a clogged section where necessary. Do not try to pull a built-in emitter out as though it were a separate fitting.
What did you find?
Normal flow returns at that location
Next stepObserve the next full run and check for a leak at the repair.
The same spot remains weak
Next stepInspect its upstream supply path. If clogging recurs, review filtration and water quality with the supplier.
03A whole line: inspect what feeds it
Rain Bird’s troubleshooting guide lists damaged upstream tubing, a blocked or unsuitable filter, faulty emitters, and pressure outside the intended range among causes of missing or uneven flow. Check those shared components before adding watering time.
With the supply off and pressure released, service the filter according to its instructions. If your dripline has a flushing procedure, follow it and inspect the discharged water. Opening a pressurised housing or poking larger holes in emitters is not a substitute for maintenance.
What did you find?
Flow improves after filter maintenance or flushing
Next stepReconnect securely, restore normal operation, and check the original weak locations again.
Flow is still weak throughout
Next stepCheck the regulator’s specified pressure and flow range, supply capacity, and the number of outlets on the zone.
04Weak at the far end: check the design limits
Do not select a regulator solely because its pressure sounds familiar. Hunter, for example, describes different regulator options for point-source systems and pressure-compensating inline tubing. These examples are not universal settings for other products.
Pressure-compensating emitters still have a specified operating range. Compare the exact tubing’s length and flow limits with the installed layout, including any recently added outlets. If you have suitable test points and a compatible gauge, follow the manufacturer’s measurement procedure; otherwise ask an installer to measure the working pressure.
The check
Record tubing size, approximate run length, changes in height, emitter ratings and count, and regulator details.
What did you find?
The layout exceeds the product’s limits
Next stepAsk the supplier about resizing the line or dividing the zone. A longer run time does not correct an unsuitable layout.
The layout appears suitable
Next stepHave the operating pressure and supply checked before changing the regulator.
05Repeat the same observation
Use the same comparison locations after the repair. Hunter’s design guide recommends recording pressure and controller settings for later troubleshooting. Keep your before-and-after notes so a recurring fault is easier to explain.
- Check for leakage at every disturbed connection.
- Compare only like-rated outlets over the same observation period.
- Separate a flow problem from a watering-schedule decision.
- If the fault remains, share the layout and component labels with an irrigation professional.
Based on source 5.
06Worked case: use the pattern before changing the schedule
Illustrative arithmetic, not field measurements: equal-time collections from three comparable outlets give 100 mL near the inlet, 95 mL in the middle and 60 mL at the far end. The result describes a pattern worth repeating. It does not prove that the far emitter is blocked or that a particular regulator is faulty.
For this example, the far-end collection is 60% of the largest collection. Extending every run by the same amount would keep that relative difference if the flow pattern stayed unchanged. The near outlet would also run longer. First repeat the observation, check that the outlets have matching ratings and examine the line layout and operating requirements.
A second example has collections of 100, 15 and 98 mL. That pattern makes a local check around the middle outlet more useful than treating the entire line as weak. Label each sample with its position so that the next test uses the same outlets. Use the timed-collection guide linked below when you want to convert volumes into flow rates.
Take a useful record away
Your irrigation check sheet
Use these prompts on paper or print this guide. Keep unknown items marked as pending; a completed record is not a diagnosis.
- Zone and sampled outlet locations
- Matching emitter models and ratings confirmed
- Collection duration and volume at each location
- One change made before the repeat observation
- Repeat volumes; unresolved questions; next check
Use your browser’s Print command, or “Print guide” at the top, to print or save a PDF.
Check the original guidance
Sources & verification
Sources checked on . First published . Follow the manual for your exact model if its instructions differ.
- UC Agriculture and Natural Resources: drip irrigation troubleshooting
- Hunter: inline drip maintenance, flushing and repair
- Rain Bird: Low-Volume Design Manual — troubleshooting, page 76
- Hunter: pressure regulation for drip irrigation
- Hunter: drip design guide — operation and maintenance
Diagrams and the order of checks are YardOnAuto’s explanatory presentation of the cited guidance, not manufacturer installation drawings.
Our editorial method